

Click here to enrol for a course on workflows
For the contractor-facing article on what to do when quotes are requested of you, please click here.
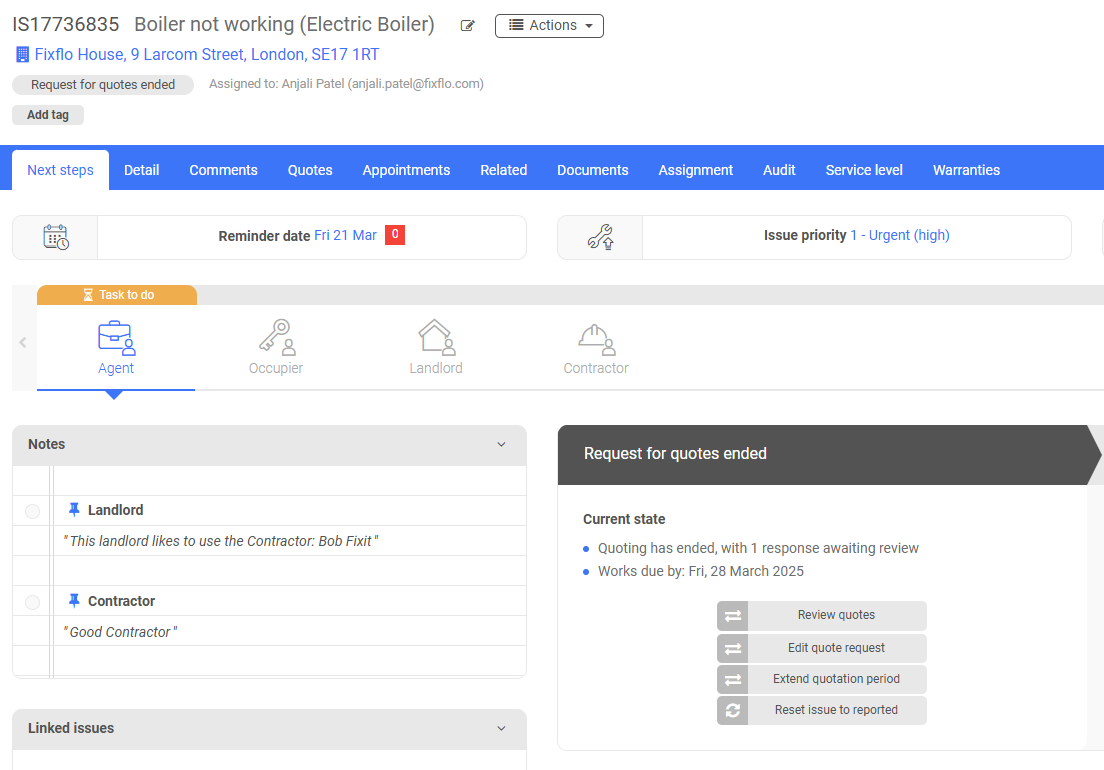
Select the issue as usual and remain on the 'Next steps' tab. This is the place you will need to be in order to use a works flow and progress the issue. The issue will begin with the issue status 'Reported'. This can be found towards the top of the page on the left hand side of the screen. Underneath the 'Reminder date' you will be able to see everyone involved with the issue and who the issue lies with.

It is important that you take a look at both the issue status and whole the issue lies with when you first of all click onto an issue. These two aspects will give you a good understanding as to where the job lies and who's responsibility it is to continue progressing the job. Both the issue status and the 'Task to do' will automatically update as you begin to progress the issue.
Before you progress the issue from the 'Reported' status we would recommend that you check to see if there are any notes on the issue. Notes can be made about:
- The Property
- The Occupier
- The Landlord
- The Contractor
The notes which have been made may change the way a maintenance issue is dealt with and therefore could alter the works flow you choose to choose next. Notes will sit directly underneath the parties involved with issue on the left hand side of the screen:

To expand the note, please click on it and a pop up will appear, displaying the entire notes:

You can make any changes to the note here as well.
Please click here to find out more about adding landlord notes.
The work flows can be found on the right hand side of the page, underneath 'Next step'. You will want to select 'Request quotations':

When you click on 'Instruct works' the following pop up will appear:

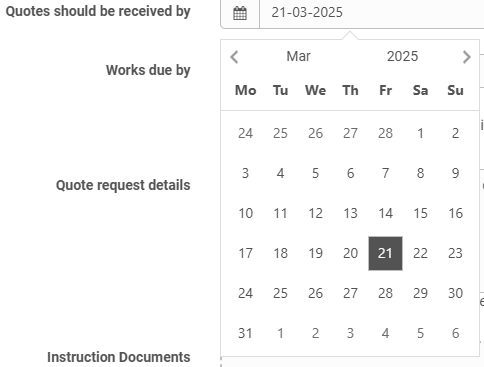
The 'Quotes should be received by' box must be filled out. When you click on the box, a calendar will appear. All you need to do is select a date and then the date will fill into the box. Please note that if the contractor does not provide a quote by the date you have given, the issue status will change to 'Request for quotes ended' and the issue will no longer sit with the contractor. Instead this will then be your 'Task to do'.
The 'Ideal work completion date' is completely optional and you can un-tick the box 'Allow the contractor to see the occupier contact information'. This will be ticked by default. The 'Quote request details' and 'Instruction documents' are also optional.
When you scroll down, you will see there is some more information to add before you can select a contractor to instruct the job to.
 You have the option to add 'Health & safety documents' if you wish. These must be already added to Fixflo in order to pull through.
Anything which has already been added to Setup > Document library will be pulled through on the drop-down here and can be added as a health and safety document. Please ensure that you add any documents there first.

 Documents can be added by clicking on 'Add new document' and this will then pull through to the drop-down when you go to add a health and safety document:

 The 'Payment' section will always default to 'Landlord', but you can change this on the drop-down:

You can also add a Cost code if you wish.
The final section of this pop up is the 'Invoice' section. This will be pre-set depending on what you have set up in your settings. You can make default changes by clicking on 'agency admin settings'. This can be set to either the agency, or to prefer the landlord over the agency.
Changes can also be made on a per issue basis, using this pop up.
Once you are happy simply click 'Proceed to next step'.

You will then be shown a new pop up, where you can select which contractors you would like to request quotes from. If you are looking for a particular contractor then you can use the search bar at the top of the pop up.

When you have found the contractor you would like to invite to quote, you will notice that there is some information about them on the right hand side.

Explaining these symbols:
The star rating shows the star rating given to this contractor by the agent. This can be given when you close an issue, and this is optional. The number next to the stars shows the number of agents who have given this rating. The rating will be an average across the number of agents. So in this example they have a 5 star rating, given by one agent.
 This symbol shows that this contractor is a favourite. It could mean that they are a Landlord favourite, or an agent favourite. If you hover over it, the system will let you know which.

This symbol shows whether or not the contractor is compliant with their certification. You can manage all contractor certification on Fixflo if you wish. This is done within the contractor profile. If you manage contractor certification within Fixflo then this symbol will work like a traffic light system - Green means the certificates are valid, amber means soon to expire and red symbolises that at least one certificate is invalid. Please note that you can set permissions around instructing works to contractors with expired certificates. So in this example, all of the contractor's certificates are valid.
 This number and symbol represent how many jobs the contractor currently has instructed to them at that moment in time. This has been added to ensure that you are giving the contractors a manageable amount of work. So in this example the contractor has two other jobs that they have been instructed on this Fixflo system.

Once you are happy with the contractor, you will need to select them on the left hand side of the pop up and then click 'Proceed to next step'. Please note that you can select as many contractors as you wish to provide a quote for the job.

Updates made on the 'Next steps' tab:
You will notice that the issue status will have automatically updated from 'Reported' to 'Quotes requested', the 'Reminder date' will have updated to a time and date in the future (this will reflect the date you provided when asked for a 'Quotes should be received by' date) and the 'Task to do' will have moved to 'Waiting for' contractor:

The 'Reminder date' is showing you the date which the issue will come back into your 'Issues requiring action', allowing the issue to not fall through the cracks. This can be changed by clicking on the 'Reminder date'.
Please note that you can click on 'Waiting for contractor' where you will be able to resolve the issue on their behalf. It is recommended that the contractor resolves the issue by logging in themselves or you will find that they may start relying on you to progress their issues. The system works best if each party logs in and resolves their own issues.
We also have a contractor App which allows contractors to resolve maintenance issues on the go!
The email sent to the contractor:
The contractor will receive an email which looks similar to the below:

The contractor will need to click on 'Enter your quotation', where they will log into Fixflo and resolve the issue.
Once the contractor logs in:
The contractor will be able to see a screen which looks similar to the screenshot below:

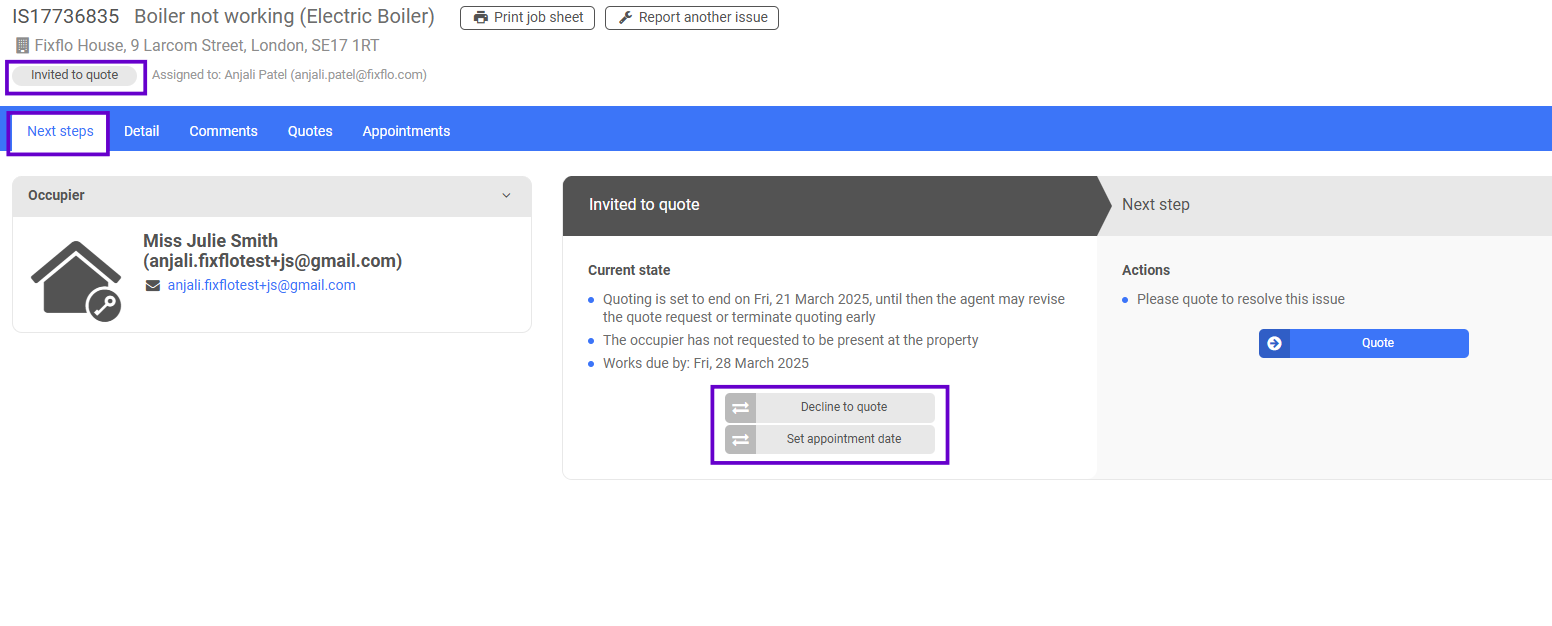
Here they can see the issue status and they can see that the next step is to 'Quote'. They can click on 'Detail' to see all of the details of the job and they can click on 'Comments' to send a message to the agent or the occupier. They also have an 'Appointments' tab where they will be able to manage appointments once they have entered the first one.
Underneath 'Quotes requested' in the middle of the screen, they also have the option to either 'Decline to quote' or 'Set appointment date'. They would use the latter if they wanted to go to the property to see the issue before providing a quote.
Before the contractor provides a quote it is important that they click on the 'Detail' tab so that they know what they are quoting for. All of the details can be found on the 'Report details' section.

The 'Job details' section will let them know when the works are due by (if this was filled in by the agent)

The 'Media' section will show them any media uploaded regarding the issue. This can help the contractor to gain a better understanding of the issue

Clicking on the photo or video will enlarge this for them on a pop up:
 If the contractor feels like they need more information to provide a quote to the agent, they can always send a message to the occupier for more detail using the 'Comments' tab or they can set an appointment date on the 'Next steps' tab. Please note that any messages between the contractor and occupier sent via the 'Comments' tab will be shown on your 'Comments' tab too.
The 'Quotes' tab and 'Appointments' tab will be blank until a quote/appointment has been added to Fixflo.
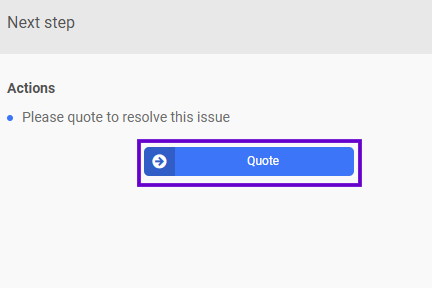
On the 'Next steps' tab they would then click on 'Quote'
When the contractor clicks on 'Quote' a pop up where they will be able to add their quote for the issue.

Before providing the actual quote, the contractor is asked for information regarding this quote. This includes the lead time required, the estimated duration of how long the job will take, the date which the quote expires (if applicable). They can also add quote details and documents.

That is all completely optional.
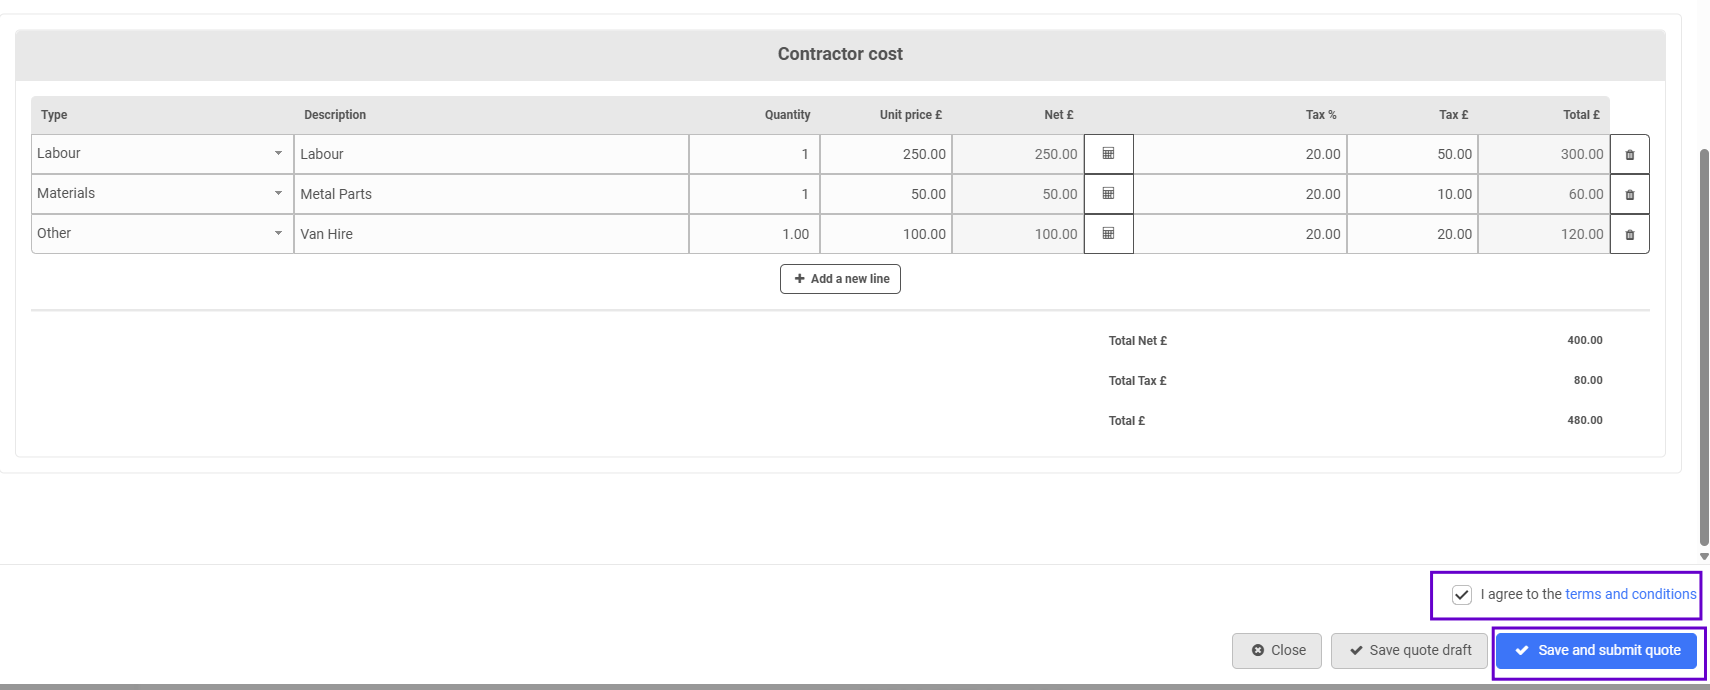
Underneath that on the pop up, the contractor is asked for a quote. They provide the cost, this is split between 'Labour', 'Materials' and 'Other' and they can add more than one row:

To add more than one row, they simply need to click on 'Add a new row':

The contractor must then enter their costs:

Once happy they must remember to agree to the terms and conditions and the press 'Save and submit quote'.
A pop up will appear which will allow the contractor to confirm and add another quote or confirm and not add another quote. If the contractor does not want to submit another quote they can go ahead and select confirm.

The contractor will then see that the issue status has now updated to 'Quoted' and that they have no further actions. They can click on 'Manage quote(s)' if they would like to review their quote(s) on the 'Quotes' tab. However the issue is now in the hands of the agent to progress the issue:

Back on the agent side, you will notice that the issue status has updated, the 'Reminder date'is back to today's date and the task to do lies with you:

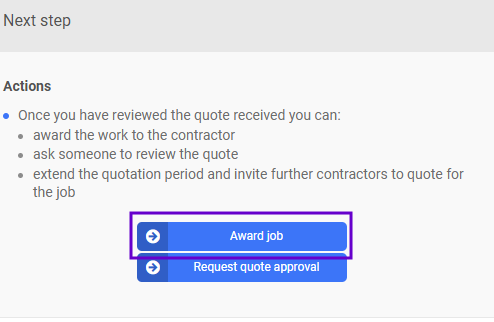
There are two next steps available, to 'Award job' or 'Request quote approval'. If you are requesting quote approval from a landlord then please click here to read the works flow. If you are requesting quote approval from an external user then please click here to read the works flow.

This article will take you through how to now award the job.
On the 'Next steps' tab, underneath 'Request for quotes ended' you can click on 'Review quotes' to see the quotes which have come in:
Clicking on 'Review quotes' will show you the following pop up where you can view the quote(s) which have come in for this job:


On the left hand side you can see the total amount which has been quoted, including VAT:
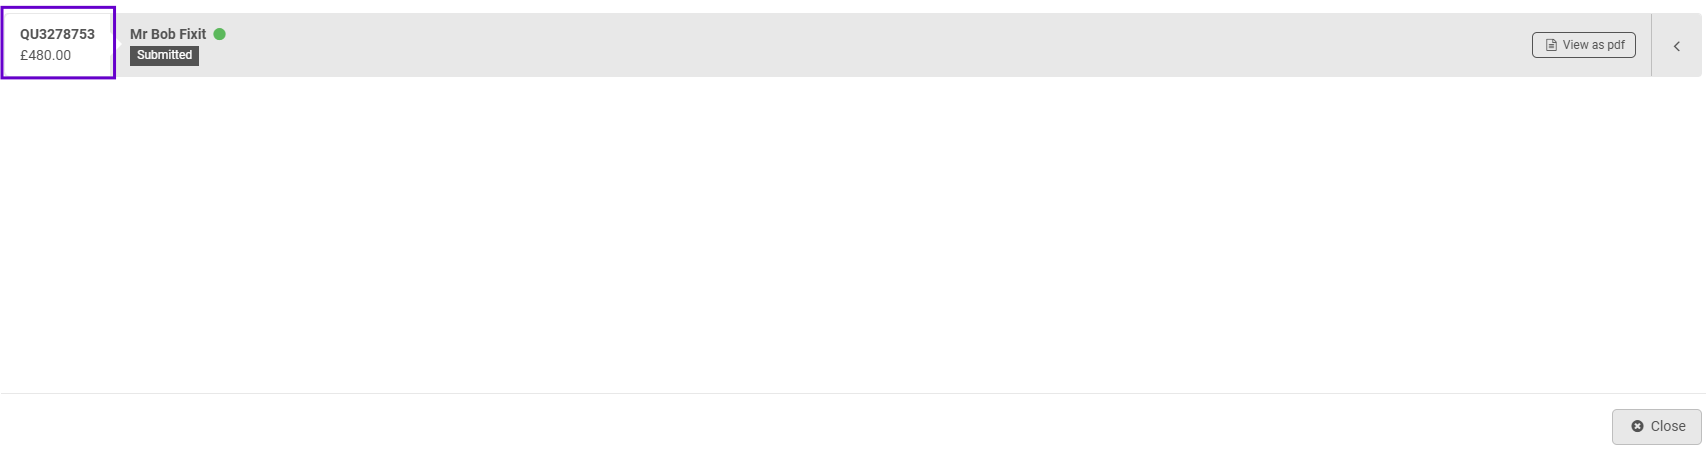
You can click on the quote to view more details and the cost breakdown:

Underneath the 'Contractor cost' on this pop up there is a works cost. This is the full inclusive cost which the landlord will see if you send this over to the landlord. You can edit this if you would like to. The landlord will not see a contractor cost and then a works cost, they will only have visibility of the works cost:

Quotes can be managed and amended via the 'Quotes' tab on an issue-by-issue basis.
Back on the 'Next steps' tab, if you are happy with the quote you will want to click 'Award job':
Once you click on 'Award job' the pop up will expand and you can then scroll down and click on 'Instruct job'. The reason for this is that it allows you to make changes to the invoice and also add instruction notes, instruction documents and health and safety documents.
Once happy, please click 'Instruct job':

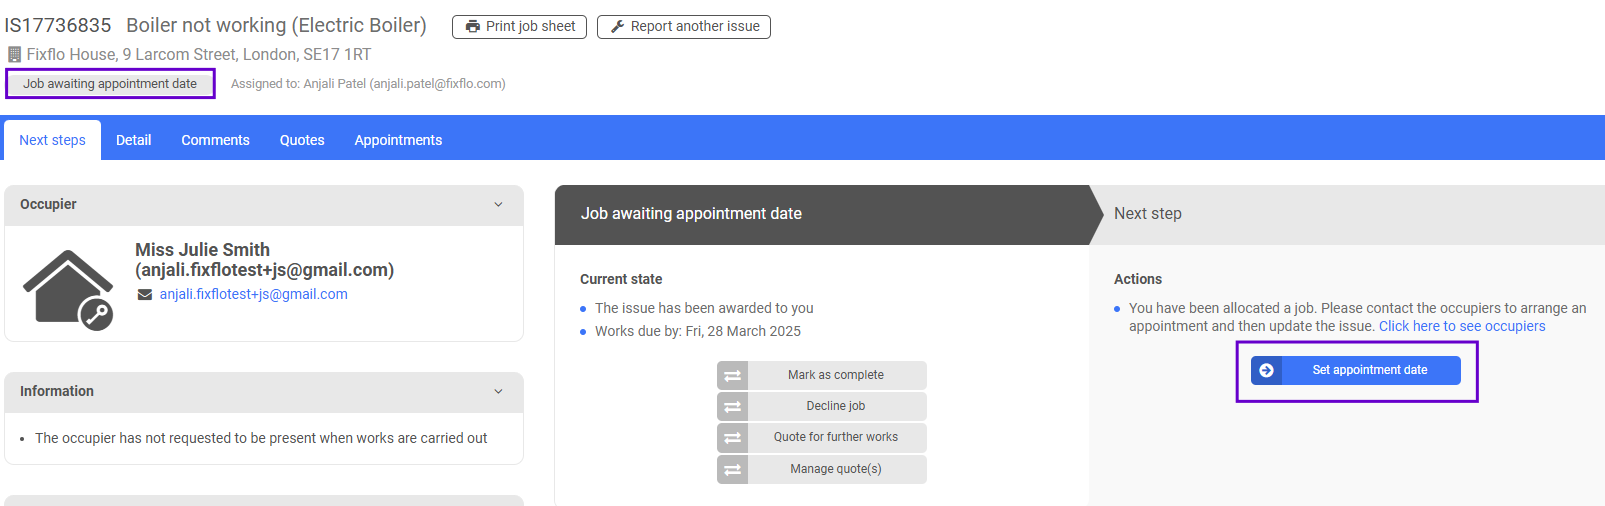
You will now notice that the issue status has updated to 'Job awarded, awaiting appointment date', the 'Reminder date' will have updated to a future date and then job is now with the contractor you awarded the job to:

You can click on the 'Contractor' so that their profile on the 'Next steps' tab is bold and the arrow is underneath them to complete their next step for them, however it is advised that you wait for the contractor to continue resolving the job themselves. You want to ensure that they are doing their bit and not relying on you to complete their actions for them.
The contractor will receive an email similar to that of below.They can click on 'Enter job start date' to login and begin progressing the issue:

Once the contractor has logged in, they will be able to see a screen which looks similar to the screenshot below:
Here they can see the issue status and they can see that the next step is to 'Set appointment date'. They can click on 'Detail' to see all of the details of the job and they can click on 'Comments' to send a message to the agent or the occupier. They also have an 'Appointments' tab where they will be able to manage appointments once they have entered the first one.
Underneath 'Job award, awaiting appointment...' in the middle of the screen, they also have the option to either 'Mark as complete' (this can be used if they have bypassed the 'Set appointment date' part); 'Provide quote instead' or 'Decline job':

Before the contractor clicks on 'Set appointment date', it's important that they look at the information on the left hand side of the 'Next steps' tab as this shows whether the occupier would like to be present or not:

When the contractor clicks on 'Set appointment date' the following pop up will appear:

When the set an appointment date they will be asked whether the appointment time and date has been agreed with the occupier. Essentially here there are four possible scenarios:
1. The occupier doesn't want to be present and the contractor has agreed the start time with the occupier
2. The occupier doesn't want to be present and the contractor has not agreed the start time with the occupier
3. The occupier does want to be present and the contractor has agreed the start time with the occupier
4. The occupier does want to be present and the contractor has not agreed the start time with the Occupier
In scenarios 1, 2 and 3 the occupier will receive an email to say that the work is due for completion with a time and date.
In scenario 4, the occupier receives an email where they have to login to the system to either accept or decline the proposed date and time.
 Once they have set the appointment date, they click on 'Save appointment date'.
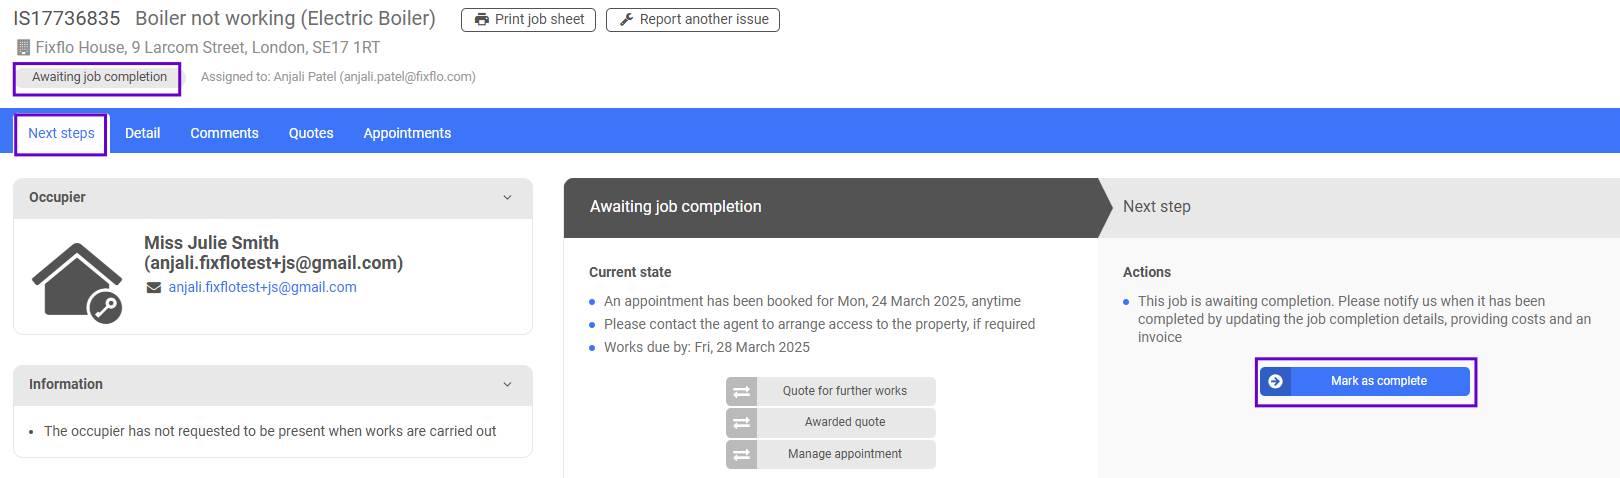
The contractor will now see that the issue status has automatically updated to 'Awaiting job completion' and the next step is to mark the job as complete. This button is sitting on the right hand side of the screen:

The appointment will be sitting in the 'Appointments' tab, where the contractor can cancel the appointment and add a follow up appointment if necessary:

Back on the 'Next steps' tab the contractor would click on 'Mark as complete' where they can add the job completion details:
The 'Job completion date' must be added, and this will pull through based on the appointment date which the contractor gave before. The job duration, feedback to the agent, the issue photos, the completion documents and the certificate documents are optional:

They must provide an invoice method and say whether they will provide the costs of the job. If they select the option to 'Create invoice within system' then the 'Provide costs' section will disappear, as they will have to provide the costs when creating the invoice.

The following invoice methods are available by default:
1. Invoice not required
2. Invoice sent outside the system
3. Upload invoice
4. Create invoice within system

Once they are happy with the job completion information, they click on 'Mark as complete':

The contractor will then be shown the following pop up:

The next screen will depend on the invoice option they have selected.
If they have selected 'Invoice not required' or 'Invoice sent outside the system' and said that they would like to provide the costs then they will see the following screen:
First of all they will see the quoted amount they sent through:
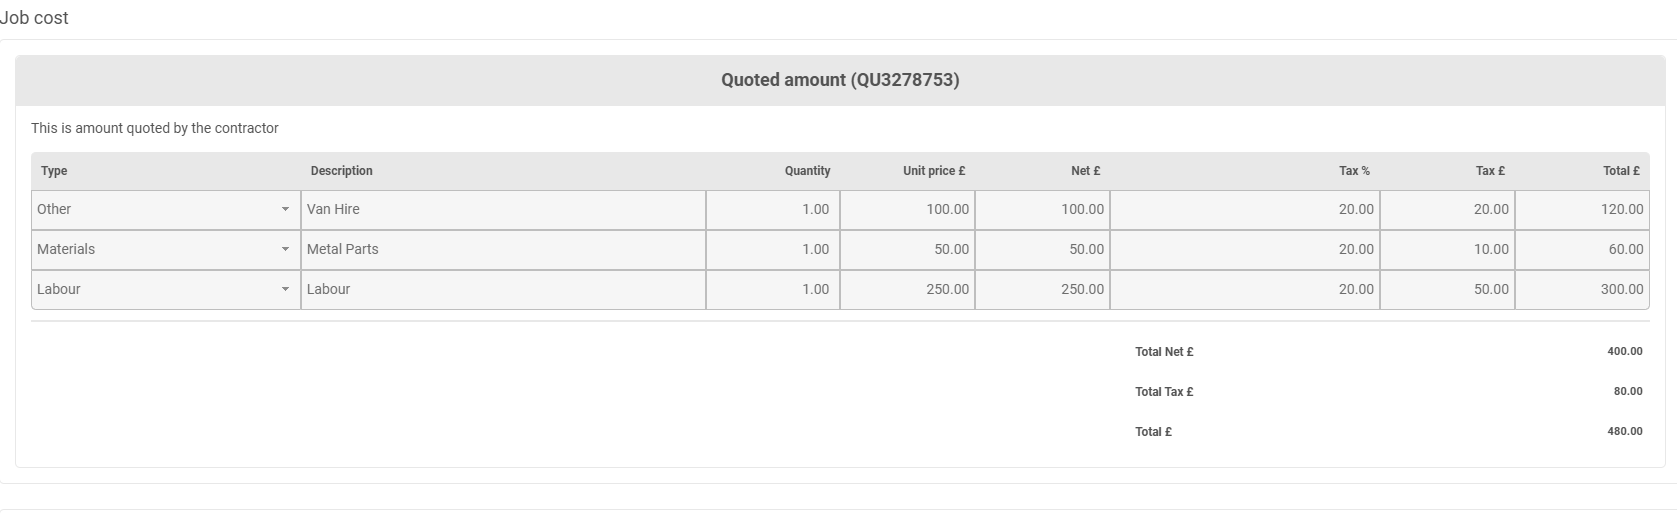
Underneath that they can put the contractor costs. The quoted amount will pull through, but they can make changes. Once they are happy, they will press 'Submit':

If they have selected 'Invoice not required' or 'Invoice sent outside the system' and said that they would not like to provide the costs then they will see the following screen:

Here the contractor can clearly see that the issue status has now moved to 'Job completed' and they can see that there are no outstanding actions for them to complete.
In the middle of the screen they have the option to 'Quote for further works', view the 'Job completion details' or 'Undo job complete'.
If they have selected 'Upload invoice' and said that they would like to provide the costs then they will see the following screen. The quoted amount will appear at the top of the pop up:

Underneath that, they can put the contractor costs. The quoted amount will pull through, but they can make changes:

Underneath that the contractor can add an invoice number, upload the invoice and then press 'Submit':
 If they have selected 'Upload invoice' and said that they would not like to provide the costs, then they will see the following screen:

If they have selected 'Create invoice within system', then they will be taken to the following screen:
The invoice date and due date will pull through. They will need to add an invoice number.

Underneath the costs which were on the original quote, which was approved by the landlord, will pull through. They can make any changes, if necessary, and then click 'Create':

The contractor will then see the following screen, which will show them that the issue status has been updated to 'Job completed, awaiting feedback'. It will either update to that issue status or 'Job completed, ready for closure', depending on whether or not you have occupier feedback turned on. Now they have the option to 'Quote for further works', view their 'Job completion details', view their 'Job costs and invoices' or 'Undo job complete'. They can also see that they have no next step as they have no actions:

If you have your settings turned on to ask the occupier for feedback, they will receive an email and look similar to that of below:

They will need to click on 'Provide feedback' which will then log them in and they can give feedback. Alternatively you can click on the 'Occupier' on your 'Next steps' tab, call them and then fill this section in for them. This can be done by clicking on 'Feedback':

It is best if each party is resolving an issue on their behalf. When the occupier clicks on 'Provide feedback' from the email they receive they will be logged into Fixflo and taken to the following page:

They have access to four tabs. On the 'Next steps' tab they can click on 'Feedback' to provide their feedback, therefore progressing the issue along. On the 'Detail' tab they can see all of the detail about the issue which they reported (or was reported on their behalf). On the 'Comments' tab they can send a message either to the agent or the contractor. They will have visibility of the appointment(s) by clicking on the 'Appointments' tab.
When the click on 'Feedback', they will first of all be asked if the issue has been resolved:

If it hasn't, they will click 'No' and they will be asked why this is. They have the opportunity to provide additional information:

If they say that the issue has been resolved then they have the option to give the contractor a star rating (out of 5 stars) and additional information.

Once happy they will press 'Save':

The occupier will now noticed that the issue status has updated to 'Job completed, ready for closure' and they have no further actions to do:

Back on the agent's side of the issue, the 'Reminder date' will show as the date which the occupier gave feedback, as the job is now in your 'Issues requiring action' as it is in the agent's 'Task to do'. The issue status has updated to 'Job completed, ready for closure' and the next step is to 'Close issue':

By clicking on 'Close issue' you will be taken to a pop up where you can add the closure information. First of all you will need to provide a close reason. This is a required field and is chosen from a drop down. The close reason notes are optional:

Please see the drop down options below:

In this example, the reason selected is 'Works completed':

This will pull through to the issue status once the issue has been closed.
Next you can send an FYI onto a party who was involved with the issue or another email address altogether:

In the same pop up, you can give a contractor star rating. This is optional and internal and will pull through to the contractor side when you are awarding the job to a contractor:

Finally, if the invoice was either uploaded to the issue or created through the system then you have the option to forward this onto a party involved with the issue or another email address:

Once happy you will want to click on 'Close issue':

The job will then be closed. The issue status will update to 'Closed' and then add the close reason you selected:

You will be able to see the following screen:

Comments can still be sent through the 'Comments' tab on a closed issue and the issue can be re-opened by clicking on the 'Actions' button and then 'Re-open issue':

Was this article helpful?
That’s Great!
Thank you for your feedback
Sorry! We couldn't be helpful
Thank you for your feedback
Feedback sent
We appreciate your effort and will try to fix the article